
For the past two Mondays, we’ve been looking at Simplicity doll clothes pattern #4654, which is a super fun pattern for those of us who have been sewing for a while.
However, in the image below, I’ve underlined some key vocabulary that tells us this isn’t the ideal pattern for the absolute beginner. With that said, it’s time for my disclaimer statement: some of the links on this page are affiliate marketing links. What does that mean? Well, for one thing, as an Amazon affiliate, I earn from qualifying purchases. Find out more on my Privacy Policy Page.

Today I’m going to talk about why certain sewing notions (those little extras that are needed for making an item of doll clothes) may not be easy to work with if you’re a beginner.
Here’s a list of notions that the absolute beginners out there who are thinking about buying a pattern may find challenging:
- Applique decorations
- Boning
- Buckles and Slides
- Buttons (not decorative, but working flat buttons)*
- Cording or piping (esp. for decoration)
- D-rings
- Eyelets (they usually require special tools)
- Interfacing
- Rayon thread or other slippery threads
- Zippers
None of these are impossible for beginners, of course, and I’m providing links here to Professor Pincushion’s tutorials on each, as she’s a fantastic teacher for all things sewing-related. She doesn’t specialize in doll-sized tutorials for any of these, though, so please bear in mind that when applying any of these notions for an 11-inch doll or smaller, the scale of the project can increase the difficulty level.
Also, Professor Pincushion’s tutorials for things like buttonhole stitches almost always show you how to make the stitch using a very modern machine. Not all of us sew with such a nice sewing machine.
If you’ve done some quilting before, then you’re probably not afraid of a little applique work, but if you’re brand new to sewing, you may want to skip the applique step on a garment.
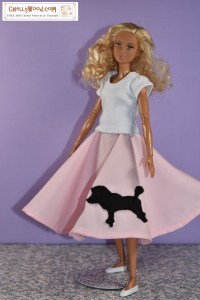
Take, for example, the poodle skirt I made a couple of weeks ago. I cut a poodle out of felt and sewed it onto my doll’s skirt. This is easy enough if you’re using felt, but if your applique uses lace or cotton, it can be a little trickier.
Cording is not hard to use as a drawstring. Heck, if you can follow my tutorials that include a casing, then you already understand the basics for using cording as a drawstring. Just replace the elastic with the cord, and wham-bam, you have an instant drawstring.
However if cording is being sewn onto the outside of a garment as a decorative element, or if piping is recommended for your doll clothes, this can sometimes be tricky.
On my patterns, I try to limit decorative elements to ribbon, lace, and rickrack, which can come in a variety of sizes and can be easy to apply. However cording, which is usually thinner than these other decorative elements, can be tricky to sew onto a tiny garment. Some patterns’ instructions will require you to use a zigzag stitch to attach your cording, or another stitch that may not be available on older sewing machines.
I was probably 16 or 17 before I ever got courageous enough to use the zigzag stitch on my old 1970’s Singer sewing machine, and my own kids tend to forget to reset stitch length after using the zigzag or another stitch on my current Madison Viking Husqvarna machine, which is annoying at best to the person who comes along later and tries to use a regular straight stitch.
So garments which will require cording or piping as part of the decorative elements can be a wee bit tricky to make, and that’s why I don’t recommend patterns that offer cording or piping as a decorative notion for anyone who is just beginning to learn how to sew.
I must admit here, that I do have a couple of patterns of my own that do require decorative piping, like this popular hooded raincoat, which I’ve given five flowers on my difficulty rating scale:

Next, any garment that requires a zipper is probably not for absolute beginners either. I do have a few patterns on my website that require zippers, and I have a new pattern coming up that will use a zipper as well. But when I was first starting out, I often accidentally sewed my zippers inside-out, so the pull tab was facing in. Ugh! That can be really aggravating!

Beginners who are just learning to sew will tell you that closures can be some of their biggest challenges. So let’s talk about buttons next…
Please note the asterisk next to “buttons” in the bulleted list at the top of this page. A shank button can be placed on a garment with a loop on the other side, and frankly, I used this type of button almost exclusively when I was a kid, with no problems whatsoever. So if you’re just starting out, you might try applying shank buttons with an elastic loop for your first doll clothing projects that require buttons. The down side to this… it will likely alter the fit of the garment, especially if the pattern suggests the use of flat buttons instead.
For the Curvy Barbie top shown in purple, I used a fabric-covered button with an embroidery floss loop to extend the garment because quite frankly, it didn’t fit Curvy correctly when I made my first prototype of that pattern. So the button-and-loop look not only has an element of “fanciness” to it, but it can also save a project from the trash can if you find it’s just a wee bit too small!
If your sewing machine doesn’t come with a buttonhole stitch, or if you have never been taught how to make a buttonhole stitch, you may find sewing buttonholes for working flat buttons somewhat challenging. I remember shying away from any patterns that required buttons when I was a teen because my buttonhole stitch on my old Singer never seemed to work right!
As far as garment fasteners go, I find Velcro to be the easiest to sew on, with snaps following suit as the second easiest to apply to a garment.
A hook-and-eye fastener is pretty easy to sew onto doll clothes by hand, but children find these fasteners challenging to use. So keep that in mind if you’re sewing doll clothes for play.
I used boning when I used to make southern-belle hoop skirts for Barbies, which were popular in the 1980’s. I was a teen sewist at that time, and I had a teenage girl’s budget to work with. So eventually I switched from store-bought boning (which was almost never small enough for the dolls I was sewing for) to simple pipe cleaners. I used to sew these pipe cleaners (aka chenille stems) into the doll’s petticoats as a makeshift boning frame for my dolls’ hoop skirts. They weren’t as durable, but they were easier to work with on the whole.
Sewing boning into a petticoat isn’t particularly difficult, but it can be very tedious. So I would never recommend the use of boning for someone who’s learning to sew. You don’t want to walk away from your first or second sewing project with the idea that sewing is unpleasant and exhausting!
The trick to buckles and slides is this: expect to put them on backwards at least once when you’re learning. Again, this is tedious and tiresome, so I don’t recommend buying patterns that use buckles and slides until you’ve already fallen in love with sewing.
Eyelets and D-rings aren’t hard to work with per se, but when making tiny doll clothes, it’s easy to misalign them. I created embroidered eyelets for my Converse-style sneakers pattern, which fits Ken, Lammily, and flat-footed beach Barbies among other dolls. These eyelets weren’t hard to make, but they took FOREVER!
With the tiny D-rings that I added to a lot of the dresses that I made for my Romeo and Juliet stop-motion film, I found that they were tricky to maneuver just because they were so tiny. It’s also impossible to find them small enough for Barbie and similar-sized dolls, so I ended up using jump rings that jewelers use in beadwork.
In the image below, the D-rings are what I looped my ribbon through on the sleeves. Tricky stuff!

Today’s blog post isn’t just a bunch of over-inflated advice from me; I’d like to hear what you have to say as well. Please scroll down and leave comments.
What notions have you found it difficult to work with? And do you know any good work-arounds? Please share!
![]()
Most of the commercial patterns I display and talk about here on ChellyWood.com are also available for sale on eBay. However, if you’ve never purchased a pattern on eBay before, it’s a good idea to read the article I wrote called, “Tips for Buying Used Doll Clothes Patterns on eBay.” It will save you time, money, and will likely prevent buyer’s remorse.
And by the way, if you use the links I’ve provided to make your eBay purchase, this website will receive a small commission, which helps fund the ChellyWood.com website, so I can continue to provide you with all the free patterns and tutorial videos offered here.
For more of my free tutorials, be sure to subscribe to my YouTube channel, ChellyWood1.
Look, I know you’ve probably already heard about it, but my “How to Alter Doll Clothes Patterns” course on the Creative Spark online learning platform will teach you how to alter pants, skirts, dresses, and shirts too. If you haven’t looked into it yet, you can click here to learn more.

I also have a new course on the Creative Spark Online Learning platform which teaches you how to design your own doll pants patterns from scratch, including leggings, overalls, and fly-front jeans. Click here to check out that new course, which is only $19.99!

For any class on Creative Spark, you don’t have to follow a schedule. Just sign up when you’re ready.
It’s a one-time fee for the course, and there’s no specific time limit to finish your course. You can just take your time and learn at the pace that suits you. So go check out my paid courses on Creative Spark, using this link.
To read about my free sewing patterns and tutorials, please visit the “Helpful Tips” page. this link.
Disclaimer/Credit/Affiliate Marketing Link:
*ChellyWood.com earns money by linking to JoAnn Fabrics, Amazon, eBay, Etsy, and other online affiliate programs. Links provided above may be affiliate links. For a full list of my affiliate programs, and to understand how cookies are used to help this website earn money, please see my “Privacy Policy” page.
Chelly Wood and the ChellyWood.com website are not affiliated with the pattern company or companies mentioned in this blog post, but Chelly finds inspiration in the doll clothes designed by these pattern companies. To purchase patterns from Simplicity, McCall’s, Butterick, Vogue, or other pattern companies shown and discussed in this blog post, please click on the links provided here. These links below the “Disclaimer” section do not help raise money for this free pattern website; they are only offered to give credit to the company that made these patterns.